summermvc 支持:
依赖注入(IoC)
声明式编程
自动参数绑定
summermvc 是一个 Python IoC 和 web MVC 框架。
源代码地址在:https://github.com/tim-chow/summermvc
summermvc 支持基于 Tornado 的异步编程,示例代码在:http://timd.cn/code/tornado-summermvc-demo/
git clone https://github.com/tim-chow/summermvc
cd summermvc/
python setup.py install
创建测试项目:
summermvc project --name test_summermvc_project -p 9093
其中,项目名称和 WSGI 服务器监听的端口号,可以自行指定。
如果对 IoC 、 WSGI 和 SpringMVC 不了解,请先阅读后面的章节。
进入到项目目录,可以看到:
application.py :WSGI 应用程序所在的模块
src/:项目源码所在的目录
其中,application.py 是程序的入口点:
import os
import logging

from summermvc.mvc import DispatcherApplication
from summermvc.application_context import FilePathApplicationContext

LOGGER = logging.getLogger(__name__)

PROJECT_BASE = "/root/test_summermvc_project"
SOURCE_ROOT = os.path.join(PROJECT_BASE, "src")
application = DispatcherApplication(
    FilePathApplicationContext(SOURCE_ROOT))


if __name__ == "__main__":
    from wsgiref.simple_server import make_server

    logging.basicConfig(level=logging.DEBUG,
                        format="%(asctime)s [%(filename)s:%(lineno)d] %(message)s",
                        datefmt="%Y-%m-%d %H:%M:%S")

    SERVER_PORT = 9093
    server = make_server("0.0.0.0", SERVER_PORT, application)
    LOGGER.info("listening on 0.0.0.0:%d", SERVER_PORT)
    server.serve_forever()
FilePathDispatcherApplication 和 BasePackageDispatcherApplication 都是 DispatcherApplication 的子类,它们分别递归地扫描“基目录”和“基包”,并创建 IoC 容器。DispatcherApplication 对象是一个 WSGI 应用程序,它在初始化时,会遍历 IoC 容器中的全部 bean,如果某个 bean 实现了 HandlerMapping 接口,则把它的对象保存到 handler mapping 列表;如果某个 bean 实现了 HandlerAdapter 接口,则把它的对象保存到 handler adapter 列表;如果某个 bean 实现了 HandlerInterceptor 接口,则把它的对象保存到 handler interceptor 列表;如果某个 bean 实现了 ViewResolver 接口,则把它的对象当作 view resolver。
处理请求时,DispatcherApplication 会逐个调用 handler mapping 列表中的每个 HandlerMapping 对象的 get_handler(request) 方法,如果某个 HandlerMapping 对象能够映射请求,则返回一个 Handler 对象。每个 Handler 对象包含一个 page_handler 和若干个 exception_handler。当容器中没有注册任何 HandlerMapping 时,那么使用 RequestMappingHandlerMapping。RequestMappingHandlerMapping 会扫描每个 bean 的实例方法,如果某个方法使用了 request_mapping 装饰器,并且 request_mapping 装饰器的 uri、请求方法、 Content-Type等参数与请求相匹配,则把它当作 page_handler;如果某个方法使用了 exception_handler 装饰器,并且 exception_handler 装饰器的 uri 参数与请求的 uri 相匹配,则把它当作一个 exception_handler。
在获取到处理请求的 Handler 对象之后,DispatcherApplication 会遍历 handler interceptor 列表,如果某个 HandlerInterceptor 对象的 path_pattern() 方法的返回值和请求的 uri 相匹配,则将其添加到本次请求的拦截器列表。之后 DispatcherApplication 使用 Handler 对象和拦截器列表,生成一个 HandlerExecutionChain 对象。
接下来,DispatcherApplication 会使用 Handler 对象逐个调用 handler adapter 列表中的每个 HandlerAdpater 对象的 supports(handler) 方法。如果某个 HandlerAdapter 对象,能够适配该 Handler 对象,则停止扫描,并使用这个 HandlerAdapter 对象,来适配 Handler 对象。当容器中没有注册任何 HandlerAdpater 时,默认使用 RequestMappingHandlerAdapter,它能够适配 RequestMappingHandlerMapping 返回的 Handler 对象。
之后,DispatcherApplication 会调用 HandlerAdpater 对象的 handle(request, response, handler_execution_chain) 方法,获取包含模型名和模型数据的 ModelAndView 对象。RequestMappingHandlerAdapter 的行为是:它首先构造 page_handler 所需要的参数列表,然后调用 HandlerExecutionChain 对象的 handle(request, response, mv, *args, **kwargs) 方法,如果调用过程中,出现异常,则执行相应的 exception_handler(如有)。在 page_handler 和 exception_handler 中,可以使用 arg_name、args_name、request、model 等形式参数,RequestMappingHandlerAdapter 在构造参数的时候,会自动的将查询参数 name 的值绑定到 arg_name,将 path pattern 中的分组的值绑定到 path_var_groupname,将本次请求对应的 request 对象绑定到 request 参数,将本次请求对应的 response 对象绑定到 response 参数,将本次请求的 ModelAndView 对象绑定到 mv 参数,将本次请求的 Model 对象绑定到 model 参数等。
HandlerExcutionChain 对象的 handle(request, response, mv, *args, **kwargs) 方法,先逐个地调用用于该请求的每个 HandlerInterceptor 对象的 pre_handle(request, response, mv) 方法,如果某个 HandlerInterceptor 对象的该方法抛出 InterceptError 异常,则停止后续的流程;否则,调用 Handler 对象的 page_handler 处理请求。之后,再逐个地调用每个 HandlerInterceptor 对象的 post_handle(request, response, mv) 方法,如果某个 HandlerInterceptor 对象的该方法抛出 InteceptError 异常,则终止 post handle 链的执行。
HandlerAdapter 对象的 handle(request, response, mv, *args, **kwargs) 方法,返回一个 ModelAndView 对象,其 view 属性表示视图名;model 属性是保存模型数据的 map 。 DispatcherApplication 会使用视图名调用 view resolver 对象,view resolver 对象应该根据视图名返回一个合适的 View 对象。DisaptcherApplication 接下来会使用模型数据渲染 View 对象,并将其作为响应,返回给客户端。
如测试项目中所示:
如果想要设置响应码,需要使用 response 对象的 set_status(status_code, message) 方法
如果想要设置响应头,需要使用 response 对象的 add_header(header_name, header_value) 方法
在使用 RequestMappingHandlerMapping 时,可以通过返回一个字符串,来表示要使用的视图名
可以向 Model 对象中添加要返回的模型数据
等等
本节将讲述处理对象之间的依赖关系的常见方式。
1,依赖具体:
比如,有一个具体实现类A,被类B、类C、类D等依赖,随着需求的变化,类A可能改动很大,维护成本也会随之增加。
这种设计方式违背了依赖倒置原则(DIP)。
2,依赖抽象:
依赖倒置原则要求:
比如,下面的 Logger 实现,开始时只有 debug()、info()、warn()、error() 等将日志打印到标准输出的方法。
class Logger(object):
    def debug(self, message):
        print("debug: %s" % message)

    def info(self, message):
        print("info: %s" % message)

    def warn(self, message):
        print("warn: %s" % message)

    def error(self, message):
        print("error: %s" % message)


if __name__ == "__main__":
    class Client1(object):
        def __init__(self):
            self._logger = Logger()

        def run(self):
            self._logger.info("%s begins to run" % self.__class__.__name__)


    class Client2(object):
        def __init__(self):
            self._logger = Logger()

        def run(self):
            self._logger.info("%s begins to run" % self.__class__.__name__)

    client1 = Client1()
    client2 = Client2()

    client1.run()
    client2.run()
之后,Client2 这个客户端类不再想把日志打印到标准输出,而是期望将日志输出到文件。这个时候,我们就要改造 Logger 类,并且还要兼容之前的使用方式,维护 Logger 类的成本会增加。下面根据DIP,改为依赖抽象。
from abc import ABCMeta, abstractmethod

class Logger(object):
    __metaclass__ = ABCMeta

    @abstractmethod
    def debug(self, message):
        pass

    @abstractmethod
    def info(self, message):
        pass

    @abstractmethod
    def warn(self, message):
        pass

    @abstractmethod
    def error(self, message):
        pass


class ConsoleLogger(Logger):
    def debug(self, message):
        print("debug: %s" % message)

    def info(self, message):
        print("info: %s" % message)

    def warn(self, message):
        print("warn: %s" % message)

    def error(self, message):
        print("error: %s" % message)


class FileLogger(Logger):
    def debug(self, message):
        print("Log to File:: debug: %s" % message)

    def info(self, message):
        print("Log to File:: info: %s" % message)

    def warn(self, message):
        print("Log to File:: warn: %s" % message)

    def error(self, message):
        print("Log to File:: error: %s" % message)


if __name__ == "__main__":
    class Client1(object):
        def __init__(self):
            self._logger = None

        def run(self):
            if self._logger is not None:
                self._logger.info("%s begins to run" % self.__class__.__name__)

        def configure_logger(self, logger):
            self._logger = logger


    class Client2(object):
        def __init__(self):
            self._logger = None

        def run(self):
            if self._logger is not None:
                self._logger.info("%s begins to run" % self.__class__.__name__)

        def configure_logger(self, logger):
            self._logger = logger


    client1 = Client1()
    client1.configure_logger(ConsoleLogger())
    client2 = Client2()
    client2.configure_logger(FileLogger())

    client1.run()
    client2.run()
此时,我们为不同的需求,创建了不同的实现类:
客户端根据自己的需求选择具体实现类。
3,工厂模式:
在上面两种方式中,客户端直接创建产品对象,因此都违反了“高内聚,低耦合”的原则。因为客户端只是“消费”产品对象,无需关心产品对象是如何组织和创建的。因此,可以将产品对象的创建细节,封装到工厂中。工厂模式有三种:
使用工厂方法模式对上面的代码进行改造:
# coding: utf8

import threading
from abc import ABCMeta, abstractmethod


class Logger(object):
    __metaclass__ = ABCMeta

    @abstractmethod
    def debug(self, message):
        pass

    @abstractmethod
    def info(self, message):
        pass

    @abstractmethod
    def warn(self, message):
        pass

    @abstractmethod
    def error(self, message):
        pass


class ConsoleLogger(Logger):
    def debug(self, message):
        print("debug: %s" % message)

    def info(self, message):
        print("info: %s" % message)

    def warn(self, message):
        print("warn: %s" % message)

    def error(self, message):
        print("error: %s" % message)


class FileLogger(Logger):
    def debug(self, message):
        print("Log to File:: debug: %s" % message)

    def info(self, message):
        print("Log to File:: info: %s" % message)

    def warn(self, message):
        print("Log to File:: warn: %s" % message)

    def error(self, message):
        print("Log to File:: error: %s" % message)


class LogFactory(object):
    _instances = {}
    _lock = threading.Lock()

    # 工厂是单例的
    def __new__(cls, *a, **kw):
        if cls in LogFactory._instances:
            return LogFactory._instances[cls]

        with LogFactory._lock:
            if cls in LogFactory._instances:
                return LogFactory._instances[cls]

            LogFactory._instances[cls] = super(LogFactory, cls).__new__(cls)
        return LogFactory._instances[cls]

    def create(self):
        logger = self.create_logger()
        return logger

    @abstractmethod
    def create_logger(self):
        pass


class ConsoleLogFactory(LogFactory):
    def create_logger(self):
        return ConsoleLogger()


class FileLogFactory(LogFactory):
    def create_logger(self):
        return FileLogger()


if __name__ == "__main__":
    class Client1(object):
        def __init__(self):
            self._logger = ConsoleLogFactory().create()

        def run(self):
            self._logger.info("%s begins to run" % self.__class__.__name__)


    class Client2(object):
        def __init__(self):
            self._logger = FileLogFactory().create()

        def run(self):
            self._logger.info("%s begins to run" % self.__class__.__name__)

    client1 = Client1()
    client2 = Client2()

    client1.run()
    client2.run()
4,控制反转(IoC,Inversion of Control)和依赖注入(DI,Dependency Injection):
在上面三种方式中,客户端主动地获取资源对象。而在控制反转中,由一个容器负责创建对象,以及处理对象之间的依赖关系,并且它反转了资源的获取方式,也就是由容器主动地将资源推送给它所管理的组件,组件所要做的仅仅是选择一种方式接收资源。
依赖注入是控制反转的一种实现方法。它是指:组件以一些预定好的方式,接受来自容器的资源注入。
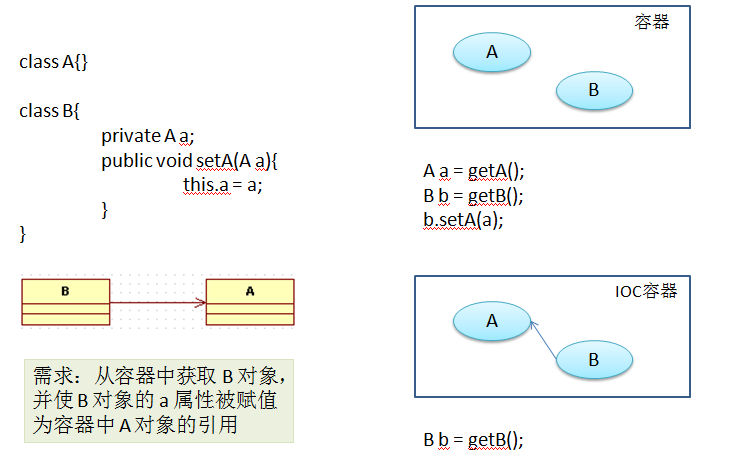
IoC 容器所管理的对象叫 bean,一个 bean 就是一个类,并且有唯一的 id(可以是与类名不同的一个别名)。只有在创建了 IoC 容器之后,才能从容器中获取 bean 的实例。
依赖注入通常有三种方式:
属性注入
构造方法注入
工厂方法注入
在 summermvc 中,一个 ApplicationContext 实例就是一个 IoC 容器。ApplicationContext 有两个子类:
其中,BasePackageApplicationContext 会递归地扫描给定的若干个“基包”及其子包中的所有模块,并将使用了 component 装饰器的类作为一个 bean。当未给 component 传递参数时,BasePackageApplicationContext 会自动地将类名作为 bean 的名称,同时,默认该 bean 是单例的。可以使用 component 的 name 参数为 bean 指定名称,使用 is_singleton 参数,来指定 bean 是否是单例的。如果 bean 是单例的,那么多次从容器中,获取该 bean 的实例,得到的都是同一个实例;否则,每次都返回一个新的实例。
configuration、repository、service、controller 和 component 是等价的,一般使用 repository 标注持久层的组件,使用 service 标注业务层的组件,使用 controller 标注控制器层的组件。
FilePathApplicationContext 与 BasePackageApplicationContent 类似,不同的是,它会递归地扫描给定的若干个目录下的所有包及其子包中的所有模块。
在创建 IoC 容器的时候,会实例化所有单例的 bean,并将它们缓存起来。
接下来看一个简单的例子。
项目结构如下:
|-- ioc.py
`-- project
    |-- controller.py
    |-- dao.py
    `-- service.py

1 directory, 4 files
ioc.py 的内容如下:
from summermvc import FilePathApplicationContext

ctx = FilePathApplicationContext("project")

controller1 = ctx.get_bean("controller")
controller2 = ctx.get_bean("controller")
print controller1 is controller2

service1 = ctx.get_bean("Service")
service2 = ctx.get_bean("Service")
print service1 is service2
project/controller.py 的内容如下:
from summermvc.decorator import *


@controller(name="controller", is_singleton=False)
class Controller(object):
    pass
project/service.py 的内容如下:
from summermvc.decorator import *


@service
class Service(object):
    pass
project/dao.py 的内容如下:
from summermvc.decorator import *


@repository
class Dao(object):
    pass
通常,controller 层依赖 service 层,service 层依赖 dao 层。在 summermvc 使用 auto_wired 装饰器配置依赖关系。auto_wired 装饰器用来标注实例方法,在获取 bean 实例时,summermvc 会将该实例方法替换为依赖的 bean 实例。因此,不要在该方法中写任何业务逻辑。
auto_wired 装饰器的参数是依赖的 bean 的名字,当不给它指定参数时,它会自动地生成名称(将实例方法名按 _ 切分,然后将每一部分首字母变大写,其余字母变小写,再连接起来。比如,实例方法名为 _service_impl,那么自动生成的名称是 ServiceImpl)。
除了配置 bean 实例之间的依赖关系,还可以使用 value 装饰器,为 bean 实例注入值。value 装饰器装饰的也是一个实例方法,并且在获取 bean 实例的时候,该方法会被替换为通过 value 装饰器的参数所指定的值。
每个 bean 都需要提供一个无参的构造方法。获取 bean 实例时,IoC 容器在创建 bean 实例之后,会自动地注入依赖的 bean 实例和值,然后调用使用了 post_construct 装饰器的方法进行初始化。对于单例 bean,当容器关闭或销毁时,会调用它的使用了 pre_destory 装饰器的方法,进行清理。
使用 IoC 容器时,客户端不必自己创建对象,而是从容器中获取对象,容器会自动地处理对象之间的依赖关系,并对对象进行管理。
summermvc 深受 SpringMVC 影响。SpringMVC 的请求处理流程如下图所示:

DispatcherServlet:
SpingMVC 的核心控制器,它是前端控制器模式的实现。DispatcherServlet 是 SpringMVC 请求处理以及返回请求的统一入口,负责进行全局的流程控制
HandlerMapping :
负责将请求映射到某个处理器(Controller)的某个处理方法上。映射成功后返回一个 HandlerExecutionChain 对象(处理器执行链),其中包括处理器(Controller)以及拦截器
HandlerExecutionChain getHandler(request) 方法。每个 HandlerMapping 实现类的这个方法中,都定义了映射规则,如果该 HandlerMapping 能够映射请求,则返回一个 HandlerExecutionChain 对象;否则返回 nullHandlerAdapter :
处理器适配器。它使用了适配器模式,它的功能是将处理器和处理方法适配成 DispatcherServlet 所需要的接口
boolean supports(Object handler):判断该适配器能否适配当前的处理器ModelAndView handle(request, response, handler):DispatcherServlet 所需要的目标接口ViewResolver :
视图解析器。DispatcherServlet 在调用 HandlerAdapter 对象的 handle() 方法后,会得到包含视图名和模型数据的 ModelAndView 对象,接下来,它会使用视图名调用 ViewResolver 获取到视图对象,然后使用模型数据进行渲染,得到最终的响应数据,返回给客户端
在 summermvc 中,DispatcherApplication 是一个 WSGI 应用程序(关于 WSGI 协议,可以参考:这篇文档),其执行流程和 SpringMVC 非常类似。