Nvidia Isaac Sim 9 - ROS2 关节控制:Extension Python 脚本
1. 学习目标
在本教程中,将与 Manipulator(Franka Emika Panda 机器人)进行交互,内容包括:
- 在 OmniGraph 中添加 ROS2 关节状态发布器和订阅器
- 使用菜单快捷方式添加 ROS2 关节状态发布器和订阅器
- 通过
Script Editor,使用 OmniGraph Python API 添加 ROS2 关节状态发布器和订阅器
- 了解
isaac:nameOverridePrim 属性
2. 开始
先决条件
- 已在运行 Python 脚本的终端中
source相应的ros2_ws。
- 在启动 Isaac Sim 之前,已设置
FASTRTPS_DEFAULT_PROFILES_FILE环境变量,并且启用 ROS2 桥接器。
3. 在 UI 中添加关节状态
- 打开该资源,可在 Isaac Sim Content 浏览器中通过
Isaac Sim > Robots > FrankaRobotics > FrankaPanda > franka.usd找到。
- 进入
Window > Graph Editors > Action Graph,创建 Action Graph。
- 将以下 OmniGraph 节点添加到该 Action Graph 中:
On Playback Tick节点:在每个仿真帧执行其他图节点。
Isaac Read Simulation Time节点:获取当前仿真时间。
ROS2 Publish Joint State节点:将 ROS2 Joint States 发布到/joint_states话题。
ROS2 Subscribe Joint State节点:从/joint_command话题订阅 ROS2 Joint States。
Articulation Controller节点:根据订阅者节点接收到的命令移动机器人关节系统。
- 选择
ROS2 Publish Joint State节点,并且将/panda机器人关节系统添加到targetPrim。
- 选择
Articulation Controller节点,通过将/panda添加到targetPrim,或在robotPath字段中输入/panda的方式,指定想要控制运动的机器人关节系统。
- 将
On Playback Tick节点的Tick输出连接到ROS2 Publish Joint State、ROS2 Subscribe JointState和Articulation Controller节点的Execution输入。
- 将
Isaac Read Simulation Time节点的Simulation Time输出连接到ROS2 Publish Joint State节点的Timestamp输入。按照下图完成节点之间的其他连接。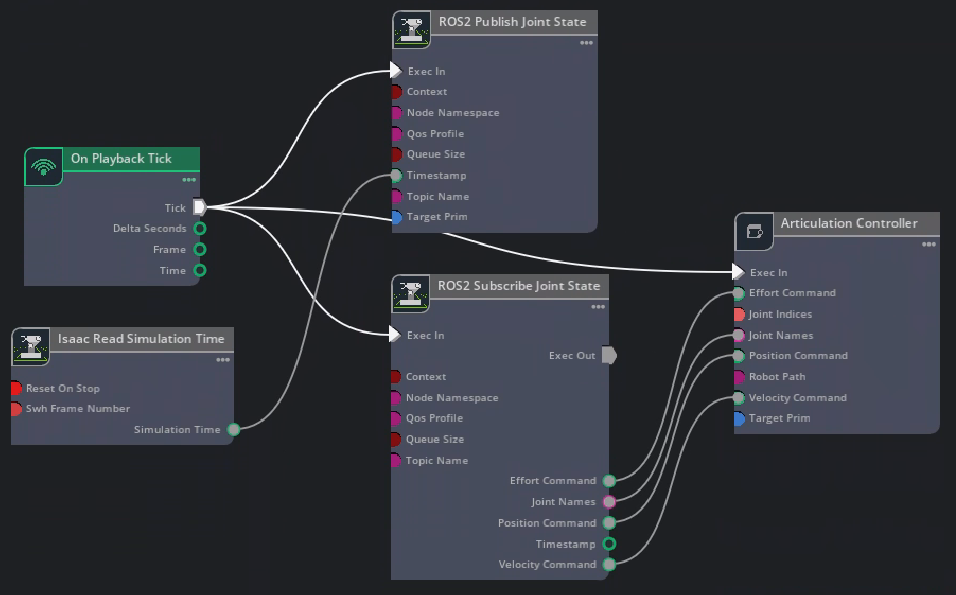
- 点击 Play 开始向
/joint_states话题发布关节状态,并且订阅/joint_command话题上的命令。
- 为测试 ROS 2 桥接功能,可以使用提供的 Python 脚本向机器人发布关节命令。在已
sourceROS 2 环境的终端中执行:ros2 run isaac_tutorials ros2_publisher.py
- 当机器人正在运动时,打开已
sourceROS 2 环境的终端,并且通过运行以下命令检查 ROS 2 的关节状态话题:ros2 topic echo /joint_states
注意
Articulation Root描述的是关节系统树的起点。关节系统树由一组连杆和关节组成,用于表示仿真中的机器人。对于像 Franka 这样的固定基座机器人,Articulation Root被指定在其与世界坐标系连接的根关节处;对于可移动对象,Articulation Root被指定在关节系统树中最深层的刚体处,通常是躯干或底盘链接。
4. 图快捷方式
Isaac Sim 提供菜单快捷方式,只需点击几下即可构建 Joint State Publisher 和 Subscriber 图。依次选择 Tools > Robotics > ROS 2 OmniGraphs > JointStates。如果菜单中未列出任何 ROS 2 图相关选项,则需要先启用 ROS 2 Bridge。
随后将弹出窗口,要求填写用于生成图的参数。必须提供 Graph Path、Node Namespace(如果需要),以及包含 Articulation Root API 的 Prim。如果使用订阅者,还可以选择添加用于控制机器人运动的 Articulation Controller 节点。
5. 在扩展中添加关节状态
可以使用 Python 脚本完成上述通过 UI 执行的操作。
- 打开该资源,可在 Isaac Sim Content 浏览器中通过
Isaac Sim > Robots > FrankaRobotics > FrankaPanda > franka.usd找到。
- 在
Window > Script Editor中打开Script Editor,然后将以下代码复制粘贴到其中。该代码等同于上一节的步骤 2-7。如果机器人在场景树中的路径不是/panda,请确保将Articulation Controller和Publish Joint State节点的目标设置为机器人的 Prim 路径(第 29 行和第 30 行)。import omni.graph.core as og og.Controller.edit( {"graph_path": "/ActionGraph", "evaluator_name": "execution"}, { og.Controller.Keys.CREATE_NODES: [ ("OnPlaybackTick", "omni.graph.action.OnPlaybackTick"), ("PublishJointState", "isaacsim.ros2.bridge.ROS2PublishJointState"), ("SubscribeJointState", "isaacsim.ros2.bridge.ROS2SubscribeJointState"), ("ArticulationController", "isaacsim.core.nodes.IsaacArticulationController"), ("ReadSimTime", "isaacsim.core.nodes.IsaacReadSimulationTime"), ], og.Controller.Keys.CONNECT: [ ("OnPlaybackTick.outputs:tick", "PublishJointState.inputs:execIn"), ("OnPlaybackTick.outputs:tick", "SubscribeJointState.inputs:execIn"), ("OnPlaybackTick.outputs:tick", "ArticulationController.inputs:execIn"), ("ReadSimTime.outputs:simulationTime", "PublishJointState.inputs:timeStamp"), ("SubscribeJointState.outputs:jointNames", "ArticulationController.inputs:jointNames"), ("SubscribeJointState.outputs:positionCommand", "ArticulationController.inputs:positionCommand"), ("SubscribeJointState.outputs:velocityCommand", "ArticulationController.inputs:velocityCommand"), ("SubscribeJointState.outputs:effortCommand", "ArticulationController.inputs:effortCommand"), ], og.Controller.Keys.SET_VALUES: [ # Providing path to /panda robot to Articulation Controller node # Providing the robot path is equivalent to setting the targetPrim in Articulation Controller node # ("ArticulationController.inputs:usePath", True), # if you are using an older version of Isaac Sim, you can uncomment this line ("ArticulationController.inputs:robotPath", "/panda"), ("PublishJointState.inputs:targetPrim", "/panda") ], }, )
- 在
Script Editor中点击Run,将添加包含所有所需节点的Action Graph。可以在Stage Tree中找到对应的ActionGraph。此脚本只能运行一次。它假定 Stage 中尚不存在ActionGraph。如需再次运行,可以新建 Stage。
- 使用提供的 ROS 2 Python 节点向机器人发布关节命令,从而测试 ROS 2 Bridge。在已
sourceROS 2 环境的终端中,运行以下命令:ros2 run isaac_tutorials ros2_publisher.py
- 在机器人运动时,使用 ROS 2 的
topic echo命令验证关节状态:ros2 topic echo /joint_states
6. 位置和速度控制模式
关节状态订阅者支持位置控制和速度控制。每个关节在同一时间只能使用一种控制模式,但同一关节系统树中的不同关节可以使用不同的控制模式。请确保根据所需控制模式正确设置每个关节的刚度和阻尼参数(位置控制:刚度 >> 阻尼;速度控制:刚度 = 0)。
以下代码片段展示如何同时使用位置控制和速度控制。做法是将使用同一控制模式的关节归为一组,并且为位置控制关节和速度控制关节分别创建消息。这样分开处理便于组织,也可以根据需要以不同频率发送。
import threading

import rclpy
from sensor_msgs.msg import JointState

rclpy.init()
node = rclpy.create_node('position_velocity_publisher')
pub = node.create_publisher(JointState, 'joint_command', 10)

# Spin in a separate thread
thread = threading.Thread(target=rclpy.spin, args=(node, ), daemon=True)
thread.start()

joint_state_position = JointState()
joint_state_velocity = JointState()

joint_state_position.name = ["joint1", "joint2","joint3"]
joint_state_velocity.name = ["wheel_left_joint", "wheel_right_joint"]
joint_state_position.position = [0.2,0.2,0.2]
joint_state_velocity.velocity = [20.0, -20.0]

rate = node.create_rate(10)
try:
    while rclpy.ok():
        pub.publish(joint_state_position)
        pub.publish(joint_state_velocity)
        rate.sleep()
except KeyboardInterrupt:
    pass
rclpy.shutdown()
thread.join()
如果需要,也可以将它们合并到一条消息中。对于不由该控制模式控制的关节,使用 nan。
joint_state = JointState()
joint_state.name = ["joint1", "joint2","joint3", "wheel_left_joint", "wheel_right_joint"]
joint_state.position = [0.2,0.2,0.2, float('nan'), float('nan')]
joint_state.velocity = [float('nan'), float('nan'), float('nan'), 20.0, -20.0]