Go 依赖注入系统 - Fx 官方文档
官方文档:https://uber-go.github.io/fx/get-started/
1. 简介
Fx 是用于 Go 的依赖注入系统。使用 Fx 可以:
在设置应用程序时,减少样板文件
消除应用程序中的全局状态
添加新组件,并且可以立即在整个应用程序中进行访问
构建通用的可共享模块
2. 入门教程
本章将介绍 Fx 的基本用法。
首先,做准备工作。
创建新项目
mkdir fxdemocd fxdemogo mod init example.com/fxdemo安装最新版本的 Fx
go get go.uber.org/fx@latest
2.1. 创建最小的应用程序
下面构建 Fx 版的 hello-world,该应用程序除打印一堆日志外,不做任何事情。
编写最小化的
main.go:package mainimport "go.uber.org/fx"func main() {fx.New().Run()}运行应用程序:
go run .将看到类似下面的输出:
[Fx] PROVIDE fx.Lifecycle <= go.uber.org/fx.New.func1()[Fx] PROVIDE fx.Shutdowner <= go.uber.org/fx.(*App).shutdowner-fm()[Fx] PROVIDE fx.DotGraph <= go.uber.org/fx.(*App).dotGraph-fm()[Fx] RUNNING该输出展示提供给 Fx 应用程序的默认对象,但是它不做任何有意义的事情。使用
Ctrl-C停止应用程序。[Fx] RUNNING^C[Fx] INTERRUPT
我们刚刚做了什么?
通过不带参数地调用 fx.New,构建空 Fx 应用程序。但是应用程序通常会向 fx.New 传递参数,以设置其组件。
然后,使用 App.Run 方法运行该应用程序。该方法将阻塞到接收到停止信号,在退出前,该方法将运行必要的清理操作。
Fx 主要用于常驻的服务端应用程序;这些应用程序在关闭时通常从部署系统接收信号。
2.2. 添加 HTTP 服务
下面向前一节的 Fx 应用程序中添加 HTTP 服务。
编写构建 HTTP 服务的函数。
// NewHTTPServer builds an HTTP server that will begin serving requests// when the Fx application starts.func NewHTTPServer(lc fx.Lifecycle) *http.Server {srv := &http.Server{Addr: ":8080"}return srv}这还不够,我们需要告诉 Fx 如何启动 HTTP 服务。这就是
fx.Lifecycle参数的作用。使用
fx.Lifecycle对象向应用程序添加 lifecyle 钩子。告诉 Fx 如何启动和停止 HTTP 服务。func NewHTTPServer(lc fx.Lifecycle) *http.Server {srv := &http.Server{Addr: ":8080"}lc.Append(fx.Hook{OnStart: func(ctx context.Context) error {ln, err := net.Listen("tcp", srv.Addr)if err != nil {return err}fmt.Println("Starting HTTP server at", srv.Addr)go srv.Serve(ln)return nil},OnStop: func(ctx context.Context) error {return srv.Shutdown(ctx)},})return srv}使用
fx.Provide将其提供给上面的 Fx 应用程序。xxxxxxxxxxfunc main() {fx.New(fx.Provide(NewHTTPServer),).Run()}运行应用程序。
xxxxxxxxxx[Fx] PROVIDE *http.Server <= main.NewHTTPServer()[Fx] PROVIDE fx.Lifecycle <= go.uber.org/fx.New.func1()[Fx] PROVIDE fx.Shutdowner <= go.uber.org/fx.(*App).shutdowner-fm()[Fx] PROVIDE fx.DotGraph <= go.uber.org/fx.(*App).dotGraph-fm()[Fx] RUNNING输出中的第一行表明已提供 Server,但是输出不包含“Starting HTTP server”消息。因此服务未运行。
为解决该问题,添加
fx.Invoke,请求被构造的 Server。xxxxxxxxxxfx.New(fx.Provide(NewHTTPServer),fx.Invoke(func(*http.Server) {}),).Run()再次运行应用程序。这次可以在输出中看到“Starting HTTP server”。
xxxxxxxxxx[Fx] PROVIDE *http.Server <= main.NewHTTPServer()[Fx] PROVIDE fx.Lifecycle <= go.uber.org/fx.New.func1()[Fx] PROVIDE fx.Shutdowner <= go.uber.org/fx.(*App).shutdowner-fm()[Fx] PROVIDE fx.DotGraph <= go.uber.org/fx.(*App).dotGraph-fm()[Fx] INVOKE main.main.func1()[Fx] RUN provide: go.uber.org/fx.New.func1()[Fx] RUN provide: main.NewHTTPServer()[Fx] HOOK OnStart main.NewHTTPServer.func1() executing (caller: main.NewHTTPServer)Starting HTTP server at :8080[Fx] HOOK OnStart main.NewHTTPServer.func1() called by main.NewHTTPServer ran successfully in 335.758µs[Fx] RUNNING向服务发送请求。
xxxxxxxxxx$ curl http://localhost:8080404 page not found请求是 404,因为服务还不知道如何处理请求。下一节将修复该问题。
停止应用程序。
xxxxxxxxxx^C[Fx] INTERRUPT[Fx] HOOK OnStop main.NewHTTPServer.func2() executing (caller: main.NewHTTPServer)[Fx] HOOK OnStop main.NewHTTPServer.func2() called by main.NewHTTPServer ran successfully in 129.875µs
我们刚刚做了什么?
使用 fx.Provide 向应用程序添加 HTTP Server。Server 连接到 Fx 应用程序的生命周期 -- 当调用 App.Run 时,开始服务请求,当应用程序收到停止信号时,停止运行。使用 fx.Invoke,保证始终实例化 HTTP Server,即便在应用程序中没有其它组件直接引用它。
后面将介绍 Fx 生命周期是什么,以及如何使用。
2.3. 注册处理器
前一节构造的 Server 可以接收请求,但是该服务不知道如何处理请求。下面修复该问题。
定义基础的 HTTP 处理器,该处理器将传入的请求体拷贝到响应。在文件底部添加如下代码。
xxxxxxxxxx// EchoHandler is an http.Handler that copies its request body// back to the response.type EchoHandler struct{}// NewEchoHandler builds a new EchoHandler.func NewEchoHandler() *EchoHandler {return &EchoHandler{}}// ServeHTTP handles an HTTP request to the /echo endpoint.func (*EchoHandler) ServeHTTP(w http.ResponseWriter, r *http.Request) {if _, err := io.Copy(w, r.Body); err != nil {fmt.Fprintln(os.Stderr, "Failed to handle request:", err)}}将其提供给应用程序:
xxxxxxxxxxfx.Provide(NewHTTPServer,NewEchoHandler,),fx.Invoke(func(*http.Server) {}),下面,编写构造
*http.ServeMux的函数。*http.ServeMux将服务接收到的请求路由到不同的处理器。在本例中,它将发送到/echo的请求路由到*EchoHandler,因此其构造器接受*EchoHandler作为参数。xxxxxxxxxx// NewServeMux builds a ServeMux that will route requests// to the given EchoHandler.func NewServeMux(echo *EchoHandler) *http.ServeMux {mux := http.NewServeMux()mux.Handle("/echo", echo)return mux}同样地,将其提供给应用程序。
xxxxxxxxxxfx.Provide(NewHTTPServer,NewServeMux,NewEchoHandler,),注意,提供给
fx.Provide的构造器的顺序无关紧要。最后,修改
NewHTTPServer函数,将 Server 连接到该*ServeMux。xxxxxxxxxxfunc NewHTTPServer(lc fx.Lifecycle, mux *http.ServeMux) *http.Server {srv := &http.Server{Addr: ":8080", Handler: mux}lc.Append(fx.Hook{运行 Server。
xxxxxxxxxx[Fx] PROVIDE *http.Server <= main.NewHTTPServer()[Fx] PROVIDE *http.ServeMux <= main.NewServeMux()[Fx] PROVIDE *main.EchoHandler <= main.NewEchoHandler()[Fx] PROVIDE fx.Lifecycle <= go.uber.org/fx.New.func1()[Fx] PROVIDE fx.Shutdowner <= go.uber.org/fx.(*App).shutdowner-fm()[Fx] PROVIDE fx.DotGraph <= go.uber.org/fx.(*App).dotGraph-fm()[Fx] INVOKE main.main.func1()[Fx] RUN provide: go.uber.org/fx.New.func1()[Fx] RUN provide: main.NewEchoHandler()[Fx] RUN provide: main.NewServeMux()[Fx] RUN provide: main.NewHTTPServer()[Fx] HOOK OnStart main.NewHTTPServer.func1() executing (caller: main.NewHTTPServer)Starting HTTP server at :8080[Fx] HOOK OnStart main.NewHTTPServer.func1() called by main.NewHTTPServer ran successfully in 215.434µs[Fx] RUNNING向 Server 发送请求。
xxxxxxxxxx$ curl -X POST -d 'hello' http://localhost:8080/echohello
我们刚刚做了什么?
使用 fx.Provide 添加更多组件。这些组件通过在构造器中添加参数的方式,声明彼此之间的依赖关系。Fx 将通过参数和函数的返回值,解析组件的依赖关系。
2.4. 添加 Logger
当前的应用程序将“Starting HTTP server”消息打印到标准输出,将错误打印到标准错误输出。两者都是全局状态。我们应该打印到 Logger 对象。
本教程使用 Zap,但也可以使用任何日志记录系统。
将 Zap Logger 提供给应用程序。本教程使用
zap.NewExample,但真实的应用程序应该使用zap.NewProduction,或者构建更加定制化的 Logger。xxxxxxxxxxfx.Provide(NewHTTPServer,NewServeMux,NewEchoHandler,zap.NewExample,),在
EchoHandler上添加持有 Logger 的字段,并且在NewEchoHandler中添加设置该字段的参数。xxxxxxxxxxtype EchoHandler struct {log *zap.Logger}func NewEchoHandler(log *zap.Logger) *EchoHandler {return &EchoHandler{log: log}}在
EchoHandler.ServeHTTP方法中,使用 Logger 代替向标准错误输出打印。xxxxxxxxxxfunc (h *EchoHandler) ServeHTTP(w http.ResponseWriter, r *http.Request) {if _, err := io.Copy(w, r.Body); err != nil {h.log.Warn("Failed to handle request", zap.Error(err))}}类似地,更新
NewHTTPServer,接收 Logger,并且将“Starting HTTP server”消息记录到该 Logger。xxxxxxxxxxfunc NewHTTPServer(lc fx.Lifecycle, mux *http.ServeMux, log *zap.Logger) *http.Server {srv := &http.Server{Addr: ":8080", Handler: mux}lc.Append(fx.Hook{OnStart: func(ctx context.Context) error {ln, err := net.Listen("tcp", srv.Addr)if err != nil {return err}log.Info("Starting HTTP server", zap.String("addr", srv.Addr))go srv.Serve(ln)(可选)也可以使用同一 Zap Logger 记录 Fx 自身的日志。
xxxxxxxxxxfunc main() {fx.New(fx.WithLogger(func(log *zap.Logger) fxevent.Logger {return &fxevent.ZapLogger{Logger: log}}),这将使用打印到 Logger 的消息替换
[Fx]消息。运行应用程序。
xxxxxxxxxx{"level":"info","msg":"provided","constructor":"main.NewHTTPServer()","type":"*http.Server"}{"level":"info","msg":"provided","constructor":"main.NewServeMux()","type":"*http.ServeMux"}{"level":"info","msg":"provided","constructor":"main.NewEchoHandler()","type":"*main.EchoHandler"}{"level":"info","msg":"provided","constructor":"go.uber.org/zap.NewExample()","type":"*zap.Logger"}{"level":"info","msg":"provided","constructor":"go.uber.org/fx.New.func1()","type":"fx.Lifecycle"}{"level":"info","msg":"provided","constructor":"go.uber.org/fx.(*App).shutdowner-fm()","type":"fx.Shutdowner"}{"level":"info","msg":"provided","constructor":"go.uber.org/fx.(*App).dotGraph-fm()","type":"fx.DotGraph"}{"level":"info","msg":"initialized custom fxevent.Logger","function":"main.main.func1()"}{"level":"info","msg":"invoking","function":"main.main.func2()"}{"level":"info","msg":"OnStart hook executing","callee":"main.NewHTTPServer.func1()","caller":"main.NewHTTPServer"}{"level":"info","msg":"Starting HTTP server","addr":":8080"}{"level":"info","msg":"OnStart hook executed","callee":"main.NewHTTPServer.func1()","caller":"main.NewHTTPServer","runtime":"6.292µs"}{"level":"info","msg":"started"}向 Server POST 请求。
xxxxxxxxxx$ curl -X POST -d 'hello' http://localhost:8080/echohello
我们刚刚做了什么?
使用 fx.Provide 将另一个组件添加到应用程序,并且将其注入进需要打印日志的其它组件。为实现这一点,只需要在构造器中添加新参数。
在可选步骤中,告诉 Fx 我们希望为 Fx 自身的操作提供自定义 Logger。使用现有的 fxevent.ZapLogger 从注入的 Logger 构建该自定义 Logger,以使所有日志遵循相同的格式。
2.5. 解耦注册
前面的 NewServeMux 明确声明对 EchoHandler 的依赖。这是不必要的紧耦合。ServeMux 是否真得需要知道确切的处理器实现?如果为 ServeMux 编写测试,那么不应该构造 EchoHandler。
下面尝试修复该问题。
在
main.go中定义Route类型。它是http.Handler的扩展,该处理器知道其注册路径。xxxxxxxxxx// Route is an http.Handler that knows the mux pattern// under which it will be registered.type Route interface {http.Handler// Pattern reports the path at which this is registered.Pattern() string}修改
EchoHandler实现该接口。xxxxxxxxxxfunc (*EchoHandler) Pattern() string {return "/echo"}在
main()中,对NewEchoHandler条目做注解,以声明将该处理器当作 Route 提供给应用程序。xxxxxxxxxxfx.Provide(NewHTTPServer,NewServeMux,fx.Annotate(NewEchoHandler,fx.As(new(Route)),),zap.NewExample,),修改
NewServeMux接受 Route,并且使用其提供的模式。xxxxxxxxxx// NewServeMux builds a ServeMux that will route requests// to the given Route.func NewServeMux(route Route) *http.ServeMux {mux := http.NewServeMux()mux.Handle(route.Pattern(), route)return mux}运行服务。
xxxxxxxxxx{"level":"info","msg":"provided","constructor":"main.NewHTTPServer()","type":"*http.Server"}{"level":"info","msg":"provided","constructor":"main.NewServeMux()","type":"*http.ServeMux"}{"level":"info","msg":"provided","constructor":"fx.Annotate(main.NewEchoHandler(), fx.As([[main.Route]])","type":"main.Route"}{"level":"info","msg":"provided","constructor":"go.uber.org/zap.NewExample()","type":"*zap.Logger"}{"level":"info","msg":"provided","constructor":"go.uber.org/fx.New.func1()","type":"fx.Lifecycle"}{"level":"info","msg":"provided","constructor":"go.uber.org/fx.(*App).shutdowner-fm()","type":"fx.Shutdowner"}{"level":"info","msg":"provided","constructor":"go.uber.org/fx.(*App).dotGraph-fm()","type":"fx.DotGraph"}{"level":"info","msg":"initialized custom fxevent.Logger","function":"main.main.func1()"}{"level":"info","msg":"invoking","function":"main.main.func2()"}{"level":"info","msg":"OnStart hook executing","callee":"main.NewHTTPServer.func1()","caller":"main.NewHTTPServer"}{"level":"info","msg":"Starting HTTP server","addr":":8080"}{"level":"info","msg":"OnStart hook executed","callee":"main.NewHTTPServer.func1()","caller":"main.NewHTTPServer","runtime":"10.125µs"}{"level":"info","msg":"started"}向其发送请求。
xxxxxxxxxx$ curl -X POST -d 'hello' http://localhost:8080/echohello
我们刚刚做了什么?
引入接口从使用者解耦实现。然后使用 fx.Annotate 和 fx.As 对前面提供的构造器做注解,以将其结果强制转换为接口。通过这种方式,NewEchoHandler 可以继续返回 *EchoHandler。
2.6. 注册另一个处理器
下面添加另一个处理器。
在同一文件中创建新处理器。
xxxxxxxxxx// HelloHandler is an HTTP handler that// prints a greeting to the user.type HelloHandler struct {log *zap.Logger}// NewHelloHandler builds a new HelloHandler.func NewHelloHandler(log *zap.Logger) *HelloHandler {return &HelloHandler{log: log}}为该处理器实现
Route接口。xxxxxxxxxxfunc (*HelloHandler) Pattern() string {return "/hello"}func (h *HelloHandler) ServeHTTP(w http.ResponseWriter, r *http.Request) {body, err := io.ReadAll(r.Body)if err != nil {h.log.Error("Failed to read request", zap.Error(err))http.Error(w, "Internal server error", http.StatusInternalServerError)return}if _, err := fmt.Fprintf(w, "Hello, %s\n", body); err != nil {h.log.Error("Failed to write response", zap.Error(err))http.Error(w, "Internal server error", http.StatusInternalServerError)return}}该处理器读取其请求体,并且向调用者返回欢迎消息。
将其作为
Route提供给应用程序,放在NewEchoHandler旁边。xxxxxxxxxxfx.Annotate(NewEchoHandler,fx.As(new(Route)),),fx.Annotate(NewHelloHandler,fx.As(new(Route)),),运行应用程序 - 服务将启动失败。
xxxxxxxxxx[Fx] PROVIDE *http.Server <= main.NewHTTPServer()[Fx] PROVIDE *http.ServeMux <= main.NewServeMux()[Fx] PROVIDE main.Route <= fx.Annotate(main.NewEchoHandler(), fx.As([[main.Route]])[Fx] Error after options were applied: fx.Provide(fx.Annotate(main.NewHelloHandler(), fx.As([[main.Route]])) from:[...][Fx] ERROR Failed to start: the following errors occurred:- fx.Provide(fx.Annotate(main.NewHelloHandler(), fx.As([[main.Route]])) from:[...]Failed: cannot provide function "main".NewHelloHandler ([..]/main.go:53): cannot provide main.Route from [0].Field0: already provided by "main".NewEchoHandler ([..]/main.go:80)输出很多,但在错误信息内部,可以看到:
xxxxxxxxxxcannot provide main.Route from [0].Field0: already provided by "main".NewEchoHandler ([..]/main.go:80)失败原因是 Fx 不允许容器中存在相同类型的两个实例,并且未对它们进行注解。
NewServeMux不知道使用哪个Route。下面进行修复。在
main()中,使用名称对NewEchoHandler和NewHelloHandler进行注解。xxxxxxxxxxfx.Annotate(NewEchoHandler,fx.As(new(Route)),fx.ResultTags(`name:"echo"`),),fx.Annotate(NewHelloHandler,fx.As(new(Route)),fx.ResultTags(`name:"hello"`),),向
NewServeMux添加另一个Route参数。xxxxxxxxxx// NewServeMux builds a ServeMux that will route requests// to the given routes.func NewServeMux(route1, route2 Route) *http.ServeMux {mux := http.NewServeMux()mux.Handle(route1.Pattern(), route1)mux.Handle(route2.Pattern(), route2)return mux}在
main()中,对NewServeMux进行注解,以使用这两个名称值。xxxxxxxxxxfx.Provide(NewHTTPServer,fx.Annotate(NewServeMux,fx.ParamTags(`name:"echo"`, `name:"hello"`),),运行程序。
xxxxxxxxxx{"level":"info","msg":"provided","constructor":"main.NewHTTPServer()","type":"*http.Server"}{"level":"info","msg":"provided","constructor":"fx.Annotate(main.NewServeMux(), fx.ParamTags([\"name:\\\"echo\\\"\" \"name:\\\"hello\\\"\"])","type":"*http.ServeMux"}{"level":"info","msg":"provided","constructor":"fx.Annotate(main.NewEchoHandler(), fx.ResultTags([\"name:\\\"echo\\\"\"]), fx.As([[main.Route]])","type":"main.Route[name = \"echo\"]"}{"level":"info","msg":"provided","constructor":"fx.Annotate(main.NewHelloHandler(), fx.ResultTags([\"name:\\\"hello\\\"\"]), fx.As([[main.Route]])","type":"main.Route[name = \"hello\"]"}{"level":"info","msg":"provided","constructor":"go.uber.org/zap.NewExample()","type":"*zap.Logger"}{"level":"info","msg":"provided","constructor":"go.uber.org/fx.New.func1()","type":"fx.Lifecycle"}{"level":"info","msg":"provided","constructor":"go.uber.org/fx.(*App).shutdowner-fm()","type":"fx.Shutdowner"}{"level":"info","msg":"provided","constructor":"go.uber.org/fx.(*App).dotGraph-fm()","type":"fx.DotGraph"}{"level":"info","msg":"initialized custom fxevent.Logger","function":"main.main.func1()"}{"level":"info","msg":"invoking","function":"main.main.func2()"}{"level":"info","msg":"OnStart hook executing","callee":"main.NewHTTPServer.func1()","caller":"main.NewHTTPServer"}{"level":"info","msg":"Starting HTTP server","addr":":8080"}{"level":"info","msg":"OnStart hook executed","callee":"main.NewHTTPServer.func1()","caller":"main.NewHTTPServer","runtime":"56.334µs"}{"level":"info","msg":"started"}发送请求。
xxxxxxxxxx$ curl -X POST -d 'hello' http://localhost:8080/echohello$ curl -X POST -d 'gopher' http://localhost:8080/helloHello, gopher
我们刚刚做了什么?
添加构造器,用于生成与现有类型相同类型的值。使用 fx.ResultTags 对构造器进行注解,生成命名值,使用 fx.ParamTags 对使用者进行注解,使用这些命名值。
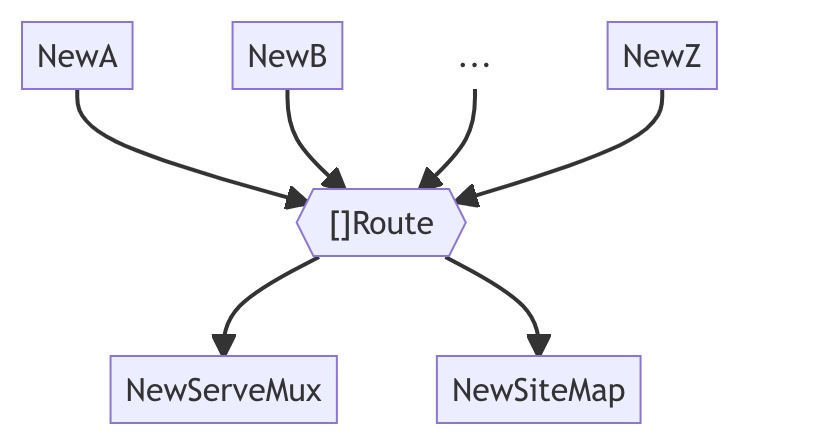
2.7. 注册多个处理器
前面的示例有两个处理器,但是在构造 NewServeMux 时,通过名称显式地引用它们。如果添加更多处理器,这种方式将变得不方便。
如果 NewServeMux 无需知道有多少个处理器或者名称,而只接受待注册的处理器列表,那么更可取。
修改
NewServeMux,使其操作Route对象的列表。xxxxxxxxxxfunc NewServeMux(routes []Route) *http.ServeMux {mux := http.NewServeMux()for _, route := range routes {mux.Handle(route.Pattern(), route)}return mux}在
main中,对NewServeMux条目进行注解,以说明它接收包含“routes”组内容的切片。xxxxxxxxxxfx.Provide(NewHTTPServer,fx.Annotate(NewServeMux,fx.ParamTags(`group:"routes"`),),定义新函数
AsRoute,以构造提供给该组的函数。xxxxxxxxxx// AsRoute annotates the given constructor to state that// it provides a route to the "routes" group.func AsRoute(f any) any {return fx.Annotate(f,fx.As(new(Route)),fx.ResultTags(`group:"routes"`),)}在
main()中,使用AsRoute包装NewEchoHandler和NewHelloHandler构造器,以便它们将路由提供给该组。xxxxxxxxxxfx.Provide(AsRoute(NewEchoHandler),AsRoute(NewHelloHandler),zap.NewExample,),最后,运行该应用程序。
xxxxxxxxxx{"level":"info","msg":"provided","constructor":"main.NewHTTPServer()","type":"*http.Server"}{"level":"info","msg":"provided","constructor":"fx.Annotate(main.NewServeMux(), fx.ParamTags([\"group:\\\"routes\\\"\"])","type":"*http.ServeMux"}{"level":"info","msg":"provided","constructor":"fx.Annotate(main.NewEchoHandler(), fx.ResultTags([\"group:\\\"routes\\\"\"]), fx.As([[main.Route]])","type":"main.Route[group = \"routes\"]"}{"level":"info","msg":"provided","constructor":"fx.Annotate(main.NewHelloHandler(), fx.ResultTags([\"group:\\\"routes\\\"\"]), fx.As([[main.Route]])","type":"main.Route[group = \"routes\"]"}{"level":"info","msg":"provided","constructor":"go.uber.org/zap.NewExample()","type":"*zap.Logger"}{"level":"info","msg":"provided","constructor":"go.uber.org/fx.New.func1()","type":"fx.Lifecycle"}{"level":"info","msg":"provided","constructor":"go.uber.org/fx.(*App).shutdowner-fm()","type":"fx.Shutdowner"}{"level":"info","msg":"provided","constructor":"go.uber.org/fx.(*App).dotGraph-fm()","type":"fx.DotGraph"}{"level":"info","msg":"initialized custom fxevent.Logger","function":"main.main.func1()"}{"level":"info","msg":"invoking","function":"main.main.func2()"}{"level":"info","msg":"OnStart hook executing","callee":"main.NewHTTPServer.func1()","caller":"main.NewHTTPServer"}{"level":"info","msg":"Starting HTTP server","addr":":8080"}{"level":"info","msg":"OnStart hook executed","callee":"main.NewHTTPServer.func1()","caller":"main.NewHTTPServer","runtime":"5µs"}{"level":"info","msg":"started"}发送请求。
xxxxxxxxxx$ curl -X POST -d 'hello' http://localhost:8080/echohello$ curl -X POST -d 'gopher' http://localhost:8080/helloHello, gopher
我们刚刚做了什么?
对 NewServeMux 进行注解,使其将值组当作切片使用,并且对现有处理器构造器进行注解,将其提供给该值组。应用程序中的任何构造函器只要结果符合 Route 接口,都可以向该值组提供值。它们将被收集在一起,并且被传递给 ServeMux 构造器。
3. 概念
3.1. 应用程序生命周期
Fx 应用程序的生命周期有两个阶段:初始化和执行。这两个阶段依次由多个步骤组成。
在初始化期间,Fx 将:
注册传递给
fx.Provide的所有构造器注册传递给
fx.Decorate的所有装饰器运行传递给
fx.Invoke的所有函数,按需调用构造器和装饰器
在执行期间,Fx 将:
运行由 Provider、Decorator、Invoked 函数追加到应用程序的所有启动钩子
等待停止运行的信号
运行追加到应用程序的所有关闭钩子

3.1.1. 生命周期钩子
当应用程序启动或关闭时,生命周期钩子提供调度 Fx 执行的工作的能力。Fx 提供两种钩子:
启动钩子,也被称为
OnStart钩子。Fx 按照追加的顺序运行这些钩子。关闭钩子,也被称为
OnStop钩子。运行顺序与追加顺序相反
通常,提供启动钩子的组件也提供相应的关闭钩子,以释放启动时申请的资源。
Fx 使用硬超时强制运行这两种钩子。因此,钩子只有在需要调度工作时才可以阻塞。换言之,
钩子不能因同步运行长时间运行的任务而阻塞
钩子应该在后台协程中调度长时间运行的任务
关闭钩子应该关闭启动钩子启动的后台工作
3.2. 模块
Fx 模块是可共享的 Go 库或包,向 Fx 应用程序提供自包含(Self-Contained)的功能。
3.2.1. 编写模块
为编写 Fx 模块:
定义顶级的
Module变量(通过fx.Module调用构建)。给模块起一个简短的、容易记住的日志名称。xxxxxxxxxxvar Module = fx.Module("server",使用
fx.Provide添加模块的组件。xxxxxxxxxxvar Module = fx.Module("server",fx.Provide(New,parseConfig,),)如果模块拥有必须运行的函数,那么为其添加
fx.Invoke。xxxxxxxxxxvar Module = fx.Module("server",fx.Provide(New,parseConfig,),fx.Invoke(startServer),)如果模块在使用其依赖之前需要装饰它们,那么为其添加
fx.Decorate调用。xxxxxxxxxxvar Module = fx.Module("server",fx.Provide(New,parseConfig,),fx.Invoke(startServer),fx.Decorate(wrapLogger),)最后,如果希望将构造器的输出保留在模块(以及模块包含的模块)中,那么在提供时添加
fx.Private。xxxxxxxxxxvar Module = fx.Module("server",fx.Provide(New,),fx.Provide(fx.Private,parseConfig,),fx.Invoke(startServer),fx.Decorate(wrapLogger),)在这种情况下,
parseConfig是“server”模块私有的。任何包含“server”的模块都不能使用结果Config类型,因为它仅对“server”模块可见。
以上是关于编写模块的全部内容。本节的其余部分涵盖 Uber 为编写 Fx 模块建立的标准和惯例。
3.2.1.1. 命名
3.2.1.1.1. 包
独立的 Fx 模块,即那些作为独立库分发的模块,或者那些在库中有独立 Go 包的模块,应该以它们包装的库或者提供的功能命名,并且添加“fx”后缀。
| Bad | Good |
|---|---|
package mylib | package mylibfx |
package httputil | package httputilfx |
如果 Fx 模块是另一个 Go 包的一部分,或者是为特定应用程序编写的单服务模块,那么可以省略该后缀。
3.2.1.1.2. 参数和结果对象
参数和结果对象类型应该以它们对应的函数命名,命名方式是在函数名后添加 Params 或 Result 后缀。
例外:如果函数名以 New 开头,那么在添加 Params 或 Result 后缀前,去掉 New 前缀。
| 函数 | 参数对象 | 结果对象 |
|---|---|---|
| New | Params | Result |
| Run | RunParams | RunResult |
| NewFoo | FooParams | FooResult |
3.2.1.2. 导出边界函数
如果功能无法通过其它方式访问,那么导出模块通过 fx.Provide 或 fx.Invoke 使用的函数。
xxxxxxxxxxvar Module = fx.Module("server",  fx.Provide(    New,    parseConfig,  ),)
type Config struct {  Addr string `yaml:"addr"`}
func New(p Params) (Result, error) {
在本例中,不导出 parseConfig,因为它只是简单的 yaml.Decode,无需暴露,但仍然导出 Config,以便用户可以自己解码。
基本原则:应该可以在不使用 Fx 的情况下,使用 Fx 模块。用户应该可以直接调用构造器,获取与使用 Fx 时模块提供的相同功能。这对于紧急情况和部分迁移是必要的。
Bad case:不使用 Fx,无法构建 server
xxxxxxxxxxvar Module = fx.Module("server",fx.Provide(newServer),)func newServer(...) (*Server, error)
3.2.1.3. 使用参数对象
由模块暴露的函数不应该直接接受依赖项作为参数。而应该使用参数对象。
xxxxxxxxxxtype Params struct {  fx.In
  Log    *zap.Logger  Config Config}
func New(p Params) (Result, error) {基本原则:模块不可避免地需要声明新依赖。通过使用参数对象,可以以向后兼容的方式添加新的可选依赖,并且无需更改函数签名。
Bad case:无法在不破坏的情况下,添加新参数
xxxxxxxxxxfunc New(log *zap.Logger) (Result, error)
3.2.1.4. 使用结果对象
由模块暴露的函数不应该将其结果声明为常规返回值。而应该使用结果对象。
xxxxxxxxxxtype Result struct {  fx.Out
  Server *Server}
func New(p Params) (Result, error) {基本原则:模块将不可避免地需要返回新结果。通过使用结果对象,可以以向后兼容的方式生成新结果,并且无需更改函数签名。
Bad case:无法在不破坏的情况下,添加新结果
xxxxxxxxxxfunc New(Params) (*Server, error)
3.2.1.5. 不要提供你不拥有的东西
Fx 模块应该只向应用程序提供在其权限范围内的类型。模块不应该向应用程序提供它们碰巧使用的值。模块也不应该大量捆绑其它模块。
基本原则:这让使用者可以自由地选择依赖的来源和方式。他们可以使用你推荐的方法(比如,“include zapfix.module”),或者构建该依赖的变体。
Bad case:提供依赖
xxxxxxxxxxpackage httpfxtype Result struct {fx.OutClient *http.ClientLogger *zap.Logger // BAD}
Bad case:绑定其它模块
xxxxxxxxxxpackage httpfxvar Module = fx.Module("http",fx.Provide(New),zapfx.Module, // BAD)
例外:组织或团队级别的“kitchen sink”模块专门用于捆绑其它模块,可以忽略该规则。比如,Uber 的 uberfx.Module 模块捆绑若干其它独立模块。该模块中的所有东西都被所有服务所需要。
3.2.1.6. 保持独立模块精简
独立的 Fx 模块 -- 名称以“fx”结尾的模块很少包含重要的业务逻辑。如果 Fx 模块位于包含重要业务逻辑的包中,那么其名称中不应该有“fx”后缀。
基本原则:在不重写业务逻辑的情况下,使用方应该可以迁移到或者离开 Fx。
Good case:业务逻辑使用 net/http.Client
xxxxxxxxxxpackage httpfximport "net/http"type Result struct {fx.OutClient *http.Client}
Bad case:Fx 模块实现 Logger
xxxxxxxxxxpackage logfxtype Logger struct {// ...}func New(...) Logger
3.2.1.7. 谨慎地使用 Invoke
当选择在模块中使用 fx.Invoke 时要谨慎。根据设计,Fx 仅在应用程序通过另一个模块、构造器或 Invoke 直接或间接地使用构造器的结果时,才执行通过 fx.Provide 添加的构造器。另一方面,Fx 无条件地运行使用 fx.Invoke 添加的函数,并且在这样做时,实例化其依赖的每个直接值和传递值。
4. 特性
4.1. 参数对象
参数对象是仅用于携带特定函数或方法的参数的对象。
通常专门为函数定义参数对象,并且不与其它函数共享。参数对象不是像“user”那样的通用对象,而是专门构建的对象,比如“GetUser 函数的参数”。
在 Fx 中,参数对象只包含导出字段,并且始终附带 fx.In 标签。
4.1.1. 使用参数对象
为在 Fx 中使用参数对象,执行以下步骤:
定义新结构体类型,命名为构造器名称加上
Params后缀。如果构造器名称为NewClient,那么将结构体命名为ClientParams。如果构造器名称为New,那么将结构体命名为Params。该命名不是必须的,但是是很好的约定。xxxxxxxxxxtype ClientParams struct {}将
fx.In嵌进结构体。xxxxxxxxxxtype ClientParams struct {fx.In按值将该新类型当作参数添加到构造器中。
xxxxxxxxxxfunc NewClient(p ClientParams) (*Client, error) {将构造器的依赖项添加为该结构体的导出字段。
xxxxxxxxxxtype ClientParams struct {fx.InConfig ClientConfigHTTPClient *http.Client}在构造器中使用这些字段。
xxxxxxxxxxfunc NewClient(p ClientParams) (*Client, error) {return &Client{url: p.Config.URL,http: p.HTTPClient,// ...}, nil
4.1.2. 添加新参数
可以通过向参数对象添加新字段的方式,为构造器添加新参数。为向后兼容,新字段必须是可选的。
接受现有的参数对象。
xxxxxxxxxxtype Params struct {fx.InConfig ClientConfigHTTPClient *http.Client}func New(p Params) (*Client, error) {为新依赖,向参数对象中添加新字段,并且将其标记为可选的,以保证此改动向后兼容。
xxxxxxxxxxtype Params struct {fx.InConfig ClientConfigHTTPClient *http.ClientLogger *zap.Logger `optional:"true"`}在构造器中,使用该字段。确保处理缺少该字段的情况 - 在该情况下,将取其类型的零值。
xxxxxxxxxxfunc New(p Params) (*Client, error) {log := p.Loggerif log == nil {log = zap.NewNop()}// ...
4.2. 结果对象
结果对象是仅用于携带特定函数或方法的结果的对象。
与参数对象一样,专门为单个函数定义结果对象,并且不与其它函数共享。
在 Fx 中,结果对象只包含导出字段,并且始终附带 fx.Out 标签。
4.2.1. 使用结果对象
为在 Fx 中使用结果对象,执行以下步骤:
定义新结构体类型,命名为构造器名称加上
Result后缀。如果构造器名称为NewClient,那么将结构体命名为ClientResult。如果构造器名称为New,那么将结构体命名为Result。该命名不是必须的,但是是很好的约定。xxxxxxxxxxtype ClientResult struct {}将
fx.Out嵌进结构体。xxxxxxxxxxtype ClientResult struct {fx.Out按值将该新类型用作构造器的返回值。
xxxxxxxxxxfunc NewClient() (ClientResult, error) {将构造器生成的值添加为该结构体上的导出字段。
xxxxxxxxxxtype ClientResult struct {fx.OutClient *Client}在构造器中,设置这些字段,并且返回该结构体的实例。
xxxxxxxxxxfunc NewClient() (ClientResult, error) {client := &Client{// ...}return ClientResult{Client: client}, nil}
4.2.2. 添加新结果
可以以完全向后兼容的方式,向现有结果对象添加新值。
接受现有结果对象。
xxxxxxxxxxtype Result struct {fx.OutClient *Client}func New() (Result, error) {client := &Client{// ...}return Result{Client: client,}, nil为新结果,向结果对象中添加新字段。
xxxxxxxxxxtype Result struct {fx.OutClient *ClientInspector *Inspector}在构造器中,设置该字段。
xxxxxxxxxxreturn Result{Client: client,Inspector: &Inspector{// ...},}, nil
4.3. 注解(Annotation)
可以在将函数和值传递给 fx.Provide、fx.Supply、fx.Invoke、fx.Decorate 或 fx.Replace 之前,使用 fx.Annotate 函数对其进行注解。
4.3.1. 对函数进行注解
先决条件
函数需要满足:
当使用
fx.ParamTags进行注解时,不接受参数对象当使用
fx.ResultTags进行注解时,不返回结果对象
步骤
给定传递给
fx.Provide、fx.Invoke或fx.Decorate的函数。xxxxxxxxxxfx.Provide(NewHTTPClient,),使用
fx.Annotate包装函数。xxxxxxxxxxfx.Provide(fx.Annotate(NewHTTPClient,),),在
fx.Annotate内部,传入注解。xxxxxxxxxxfx.Provide(fx.Annotate(NewHTTPClient,fx.ResultTags(`name:"client"`),),),该注解使用名称标记函数的结果。
4.3.2. 将结构体强制转换为接口
可以使用函数注解将函数返回的结构体值强制转换为其它函数使用的接口。
先决条件
生成结构体或指针值的函数。
xxxxxxxxxxfunc NewHTTPClient(Config) (*http.Client, error) {使用生产者结果的函数。
xxxxxxxxxxfunc NewGitHubClient(client *http.Client) *github.Client {将这两个函数提供给 Fx 应用程序。
xxxxxxxxxxfx.Provide(NewHTTPClient,NewGitHubClient,),
步骤
声明匹配
*http.Client的 API 的接口。xxxxxxxxxxtype HTTPClient interface {Do(*http.Request) (*http.Response, error)}// 下面的语句在编译时检查接口是否匹配 http.Client 的 API。var _ HTTPClient = (*http.Client)(nil)修改使用者,使其接受接口,而非结构体。
xxxxxxxxxxfunc NewGitHubClient(client HTTPClient) *github.Client {最后,使用
fx.As对生产者进行注解,说明它生成接口值。xxxxxxxxxxfx.Provide(fx.Annotate(NewHTTPClient,fx.As(new(HTTPClient)),),NewGitHubClient,),
使用该改动:
被注解的函数仅将接口放进容器
生产者的 API 保持不变
使用者与实现解耦,可以独立测试
4.4. 值组(Value Group)
值组是相同类型的值的集合。Fx 应用程序中的任何构造器都可以向值组提供值。类似地,任何使用者都可以在不知道生产者完整列表的情况下从值组中读取值。
提示
Fx 生成的值以随机顺序提供给值组。不要对值组顺序做任何假设。
4.4.1. 使用值组
4.4.2. 依赖严格性
通过值组形成的依赖关系可以是:
严格的:始终被使用
软的:仅当在其它地方请求相应的构造器时,才被使用
默认情况下,值组的赖是严格的。
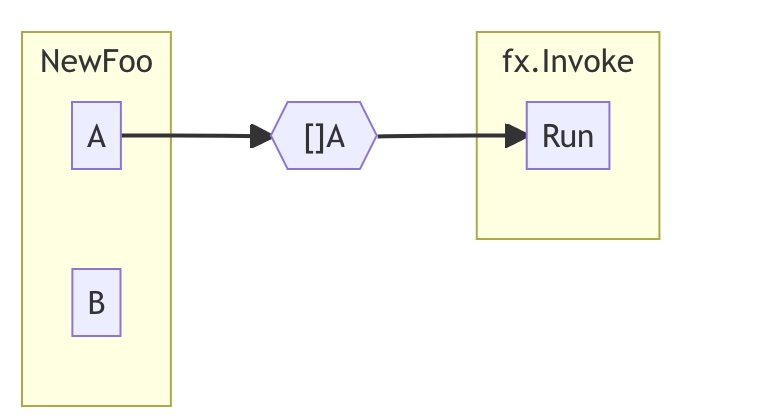
4.4.2.1. 严格的值组
无论生产者是否被应用程序使用,值组都使用严格的值组依赖。
假设构造器 NewFoo 生成两个值:A 和 B。将值 A 提供给值组 []A,函数 Run 使用该值组,应用程序使用 fx.Invoke 调用函数 Run。
对于严格的值组,Fx 将运行 NewFoo,填充 []A 组,而不管应用程序是否直接或间接地使用其它结果(B)。
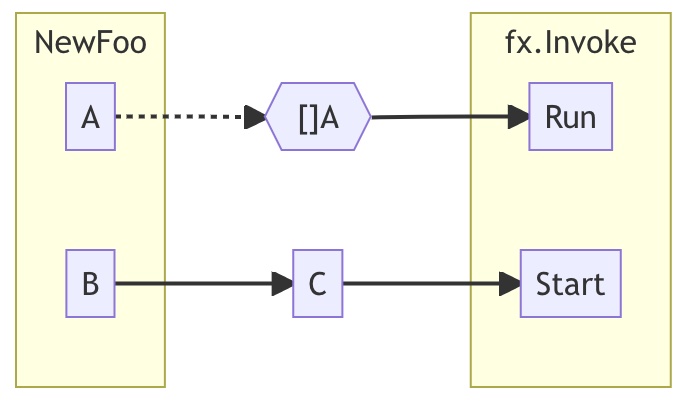
4.4.2.2. 软值组
仅当生成软值组依赖的构造器被 Fx 调用时,值组才使用软值组依赖 -- 因为应用程序直接或间接地使用它们的其它结果。
下面的组织结构除值组是软的外,与前一节类似。
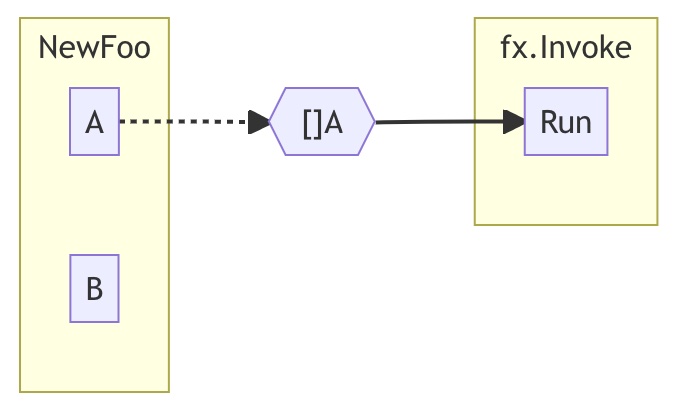
对于软值组,Fx 仅在 A 或 B 被应用程序中的另一个组件直接或间接地使用时,才运行 NewFoo 填充 []A 组。
4.4.3. 向值组提供值
为向类型为 T 的值组提供值,必须使用 group:"$name" 标记 T 结果,其中 $name 是值组名称。可以通过如下方式实现:
使用结果对象
使用带注解的函数
4.4.3.1. 使用结果对象
可以使用结果对象标记函数的结果,并且将其提供给值组。
先决条件
生成结果对象的函数。
xxxxxxxxxxtype Result struct {fx.Out// ...}func New( /* ... */ ) (Result, error) {// ...return Result{// ...Watcher: watcher,}, nil}将函数提供给 Fx 应用程序。
xxxxxxxxxxfx.Provide(New),
步骤
使用想要生成的值的类型向结果对象添加新导出字段,并且用值组的名称标记该字段。
xxxxxxxxxxtype Result struct {fx.Out// ...Watcher Watcher `group:"watchers"`}在函数中,将该字段设置为想要提供给值组的值。
xxxxxxxxxxfunc New( /* ... */ ) (Result, error) {// ...watcher := &watcher{// ...}return Result{// ...Watcher: watcher,}, nil}
4.4.3.2. 使用带注解的函数
可以使用注解向值组发送函数的结果。
先决条件
生成值组所需类型的值的函数。
xxxxxxxxxxfunc NewWatcher( /* ... */ ) (Watcher, error) {// ...将函数提供给 Fx 应用程序。
xxxxxxxxxxfx.Provide(NewWatcher,),
步骤
使用
fx.Annotate包装传递给fx.Provide的函数。xxxxxxxxxxfx.Provide(fx.Annotate(NewWatcher,),),对该函数进行注解,以说明将其结果提供给值组。
xxxxxxxxxxfx.Annotate(NewWatcher,fx.ResultTags(`group:"watchers"`),)
提示:类型无需必须匹配
如果注解的函数不生成与组相同的类型,那么可以将其强制转换为该类型:
xxxxxxxxxxfunc NewFileWatcher( /* ... */ ) (*FileWatcher, error) {仍然可以使用注解将其提供给值组。
xxxxxxxxxxfx.Annotate(NewFileWatcher,fx.As(new(Watcher)),fx.ResultTags(`group:"watchers"`),),
4.4.4. 从值组获取值
为使用类型为 T 的值组,必须使用 group:"$name" 标记 []T 依赖,其中 $name 是值组的名称。可以通过如下方式实现:
使用参数对象
使用带注解的函数
4.4.4.1. 使用参数对象
可以使用参数对象将函数的切片参数标记为值组。
先决条件
使用参数对象的函数。
xxxxxxxxxxtype Params struct {fx.In// ...}func New(p Params) (Result, error) {// ...将函数提供给 Fx 应用程序。
xxxxxxxxxxfx.Provide(New),
步骤
向参数对象添加类型为
[]T的新导出字段,其中T是值组中值的种类。使用值组名称标记该字段。xxxxxxxxxxtype Params struct {fx.In// ...Watchers []Watcher `group:"watchers"`}在接收该参数对象的函数中使用该切片。
xxxxxxxxxxfunc New(p Params) (Result, error) {// ...for _, w := range p.Watchers {// ...
警告
不要依赖切片里的值的顺序。因为顺序是随机的。
4.4.4.2. 使用带注解的函数
可以使用注解从函数中使用值组。
先决条件
接受组中的值类型的切片的函数。
xxxxxxxxxxfunc NewEmitter(watchers []Watcher) (*Emitter, error) {将函数提供给 Fx 应用程序。
xxxxxxxxxxfx.Provide(NewEmitter,),
步骤
使用
fx.Annotate包装传递给fx.Provide的函数。xxxxxxxxxxfx.Provide(fx.Annotate(NewEmitter,),),对该函数进行注解,说明其切片参数为值组。
xxxxxxxxxxfx.Annotate(NewEmitter,fx.ParamTags(`group:"watchers"`),),在函数中使用该切片。
xxxxxxxxxxfunc NewEmitter(watchers []Watcher) (*Emitter, error) {for _, w := range watchers {// ...
提示:函数可以接受变长参数
可以在接受变长参数的函数中使用值组。
xxxxxxxxxxfunc EmitterFrom(watchers ...Watcher) (*Emitter, error) {return &Emitter{ws: watchers}, nil}对变长参数进行注解。
xxxxxxxxxxfx.Annotate(EmitterFrom,fx.ParamTags(`group:"watchers"`),),